Showing posts with label cookware. Show all posts

Wednesday, February 28, 2007

Now I want a sous-vide setup!

What is sous-vide cooking? Here's what Wikipedia has to say on the subject:

...a method of cooking that is intended to maintain the integrity of ingredients by heating them for an extended period of time at relatively low temperatures. Food is cooked for a long time, sometimes well over 24 hours. But unlike a slow cooker, sous-vide cooking uses airtight plastic bags placed in hot water well below boiling point (Usually around 60°C = 140°F).

The method was developed by Georges Pralus in the mid-1970s for the Restaurant Troisgros (of Pierre and Michel Troigros) in Roanne, France. He discovered that food cooked in this way kept its original appearance, did not lose its nutrients and maintained its natural texture. The method is used in a number of top-end restaurants under Thomas Keller, Paul Bocuse, Joel Robuchon and Charlie Trotter and other chefs. Non-professional cooks are also beginning to use vacuum cooking.

Deadly botulinum bacteria can grow in food in the absence of oxygen: sous vide cooking must be performed under carefully controlled conditions to avoid botulism poisoning. To help with food safety and taste, relatively expensive water-bath machines are used to circulate precisely heated water; differences of even one degree can affect the finished product.
As the Wikipedia article relates, it was originally targeted at high-end restaurants. It has recently crept into the repetoire of many home cooks who are looking to emulate the fine dining experience. While I occasionally like to do that myself, it's not often enough to justify the investment. Or so I thought...

Enter this eGullet thread on "Quotidian Sous Vide", which explores the many everyday uses to which cooks are putting their sous vide technology. The chief advantage of sous vide is its careful temperature control - it's impossible for the food to overcook, since the goal is to equalize the temperature of the food and the water it's in. This fine control over temperature is what differentiates sous vide from it's less dignified and more well known cousin - ye old "Boil in a Bag."

Slkinsey is making his own lunchmeat:
Lately, I've been using my rig (Lauda digital recirculating water bath heater, 5 gallon stock pot, FoodSaver Professional III) to make lunchmeat for the week. I'll pick up a turkey or chicken breast, a pork loin, a brisket, beef roast, or whatever looks good and is on sale, vacuum bag it with salt and whatever other flavorings suit my fancy, cook it in the water bath as appropriate, toss the bag into an ice bath to cool down and then into the fridge. I usually do this on Sunday evenings, and on Monday morning I pull the bag out of the fridge, slice up the meat, and I have incredible sandwich meat for the rest of the week. This is not only a huge savings over buying sandwich meat at the deli counter, but there's just no way Boar's Head can ever compete with what I can make at home. What's nice also is that it's a complete snap to do sous vide -- easier than any other method, really.

Repeat after me: there's no room in your kitchen for another toy, there's no room in your kitchen for another toy.

Wednesday, October 11, 2006

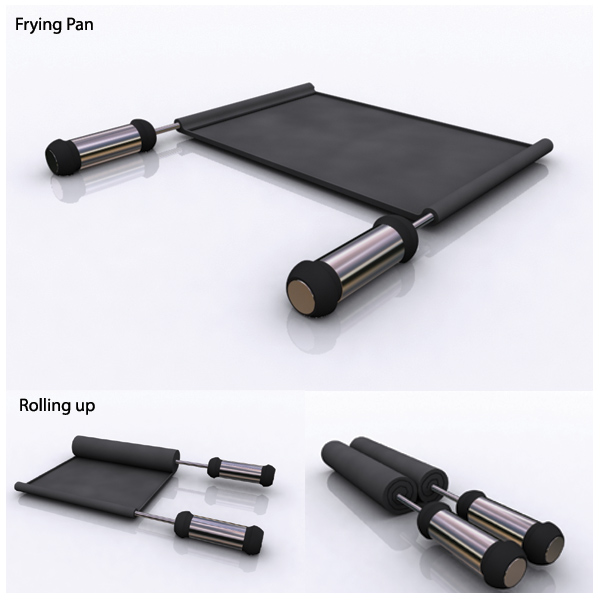
Roll-up Pan

What a keen idea! It's still only a prototype, but what a great addition this could be for cooks with too small kitchens, RV-ers and boaters. Going someplace, don't know the quality of their cookware? Just drop it in your pocket. Mostly though, it's just too cool-looking not to like.

Winner of an honorable mention in a Designboom contest. Link from Boing Boing, who got it from OhGizmo, who got it from CoolBuzz, who probably got it from somebody else.

Monday, September 25, 2006

Buying Cookware, Part Three

I ended part two of this series with some of the pros and cons of Calphalon Commerical Hard-Anodized cookware (and similar products). In my view, as someone who owns a bunch of Calphalon, there are a bunch of cons. Fortunately, there are some good alternatives that capitalize on the great heat conduction of aluminum but mitigate those problems.

The best known and mostly highly rated alternative is All-Clad. This is the brand that comes out on top of various cookware lists time and time again. It - and other brands like it - are based on "tri-ply" construction. Here's what that looks like:
The interior of the pan is a high quality stainless steel surface. Stainless steel on its own isn't a great material for cookware - it doesn't conduct heat very well, or very evenly, so you end up with lots of hot spots. But it's a great surface to cook on. It gives you a nice sear, builds up a fond so you deglaze the pan for nice sauces, and best of all - it's virtually indestructible and can be cleaned with steel wool if things get really dire. It will stick, but if you preheat the pan and the oil before adding your food you can really minimize that.

Underneath the stainless steel layer is a layer of aluminum, sandwiched between an outer layer of stainless steel. This pure aluminum core captures all of the great elements of aluminum that I talked about last time, but keeps the potentially reactive aluminum metal away from your food.

The outside layer of magnetic stainless steel gives All-Clad a shiny and attractive look while it's hanging on your pot rack. (So long as you clean the outside as thoroughly as the inside - that shiny silver exterior will show all the dishwashing lapses that Calphalon's dark gray finish hides.) In addition, that magnetic stainless layer makes All-Clad suitable for use on an induction cooktop (which heats by using magnetism to agitate the atoms of the pan itself). If that's not important for you, and you want a little extra insurance on heat conduction or prefer a darker exterior to your pan, All-Clad also makes a line called LTD that has an anodized aluminum exterior.

All-Clad is what's called, in the cookware world, "fully-clad" cookware. This just means that all the metal in the pan is that tri-ply construction. In some other manufacturers, only the bottom of the pan has an aluminum core or disc on the bottom. This distributes the heat evenly where you need it most, but the unclad sides can be prone to scorching, and - if the disc on the bottom does not extend all the way to the edges of the pan, then you can get a hot ring on the outside of the pan. For frying pans and saute pans, I'd definitely prefer a fully-clad item. But I have a Farberware saucepan with just a disc on the bottom, and I don't miss having extra thickness in the sides.

Pros: The best of both worlds - good cooking surface and good heat conduction in one pan. A couple of different exterior looks. Can work on an induction cooktop. Easy to clean, works with any utensil, can be beaten into submission with steel wool if necessary.

Cons: Expensive with a capital E! And then some. Did I mention that it's expensive? You can buy an entire set of lesser cookware for the cost of one All-Clad saute pan.

So in my view, this is one of those brands where it's definitely worthwhile to buy a piece or two, but the matched set is overkill. Skillets and saute pans are where you'll get the most bang for your buck (I'll talk about the difference between those in my next cookware post). For sauce pans, you'll probably be just as happy with something that's got a nice heavy reinforced bottom, but simply stainless steel sides.

Part One: Sets, Stock Pots and Cast Iron
Part Two: Anodized Aluminum

Wednesday, September 20, 2006

Buying Cookware, Part Two

So, in my last post I talked about stock pots and cast iron pans. Before I go on, I should add a couple more words about stock pots. Most of us use our stock pots for boiling pasta water, or making soup or stews. For those purposes, a 6 or 8 quart pan is a great size. But if you actually want to use your stock pot to make stock, then you'll want something larger - 12, 16, even 20 quarts. Particularly when it comes to these larger pots, you don't need to invest in something fancy. "Better" cookware often has multiple layers, or a reinforced bottom, and all of these features are designed to aid heat conduction and reduce hot spots and burning. But since most stock making applications don't require a browning step, a cheap stainless steel pot is going to work just fine. And if your stock recipe does require browning, you can always just use that 12 inch cast iron pan we talked about last time, and transfer the contents into your stock pot (deglazing the pan to get all the good bits, of course).

Okay, back to pans. As I said in my last post, cast iron - while great - isn't right for every application. It holds a lot of heat, and if it gets too hot, even taking it completely off the heat won't cool it down very quickly, and your food can easily burn. Cast iron is also heavy, so if you need to move the pan around a lot, it can be a real pain. So for applications where you need to have more control, another material is called for.

After cast iron, one of the best conductors of heat is aluminum. Aluminum is in many ways the complete opposite of cast iron. It's lightweight. It's very responsive to change in the heat from your gas flame or electric burner. However, aluminum in it's natural form also has some drawbacks for cooking. Like cast iron, it's reactive. This means that it will interact with the food you put in the pan, and if that food is acidic (think tomatoes or lemon juice) you can end up with aluminum ions in your food. This effect means that cooking with cast iron is a good way to get some extra iron in your diet (and the taste effect is pretty minimal so long as you don't leave things sitting for hours). But aluminum has been implicated in Alzheimer's disease, so many people are wary of using raw aluminum cookware. And aluminum cookware doesn't even have a layer of "seasoning" to reduce it's reactivity, so it can really impact the flavor of foods.

Fortunately, there are a couple of different approaches to capturing the great heat conductivity of aluminum while mitigating the risks and drawbacks. Calphalon has traditionally been the best known name in anodized aluminum cookware, having made their name with their Commercial Hard-Anodized line.

What is Hard-Anodizing?

Hard-anodization is an electro-chemical process that hardens aluminum. (Hard-Anodized aluminum is 30% harder than stainless steel.) During hard-anodization, aluminum is submerged in an acid bath, then subjected to electrical charges. The result is a chemical reaction wherein the surface of the aluminum combines with oxygen to become aluminum oxide. This reaction is also known as oxidation, a process which occurs spontaneously in nature. Hard-anodization is actually controlled, accelerated oxidation.
The anodizing process makes the aluminum non-reactive, thus addressing the chief flavor and health concerns related to aluminum cookware. Unfortunately for fans of their products, in 2004 Calphalon replaced their Commercial line with Calphalon One, a product they call "infused anodized" that incorporates a non-stick element into the metal of the pan, not just as a coating on top. I have no personal experience using Calphalon One line.

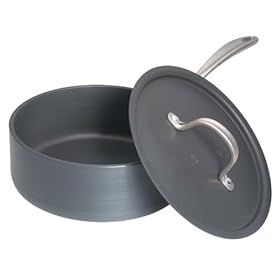
Fans of the Commerical Hard-Anodized line need not despair, as there are still plenty of pieces floating around the Internet, and there are other companies who make hard-anodized aluminum cookware. It's relatively expensive (although not as much as some of it's competitors.) I find Calphalon regularly at yard sales, where it's a great buy. Other people I know see it in resale shops. It's a dark gray matte metal, with heavy metal handles. It's functional rather than fancy in appearance. It's very high quality cookware, but like everything else, it has its pros and its cons, and it will be right for some people but not others.

Pros: It's aluminum, so the heat conductivity and responsiveness is tops. It's not non-stick coated, so there's no worry about what utensils to use and no coating to chip away. Because it's not non-stick, it browns well and gives you a good sear on meat. It's pretty heavy and thick, so not prone to warping that would create hot spots.

Cons: It takes some time to learn to cook with Calphalon. Especially if you're used to using non-stick pans, you'll need to get used to preheating the pan dry, adding your oil, and then your food. I find it harder to keep clean than some other cooking surfaces - it seems to get build up quite easily, and that build up will make it stick even more. (There's a special cleaner - Dormond - that helps remove this build up. Steel wool is not recommended, but those stiff green scrubbie pads are fine.) It's dark in color, so isn't ideal for applications like browning butter, where you're watching for certain color changes. And it can't go in the dishwasher (not that I ever put pots and pans in the dishwasher) because the dishwasher soap will discolor the interior of the pan.

If the cons sound too much for you, don't despair. There are other ways to capture the great heat conductivity of aluminum, and I'll write about those another time.

Part One: Sets, Stock Pots and Cast Iron
Part Three: Stainless Steel

Tuesday, September 19, 2006

Buying Cookware, Part One

My first job when I moved to Ann Arbor was selling cookware and other products at a popular kitchen store here in town. It was a great opportunity to learn a lot about all sorts of kitchen gadgets. But selling cookware was often my favorite part of that job. I liked talking to people about how they cooked, and helping them figure out what cookware would be right for them. Many of them were older women or couples, people who had been gifted with a cookware set for their wedding and 20 years later, had decided it was time for a change. Most often people bought entire sets of cookware, and we were happy to sell them to them. (No, I wasn't working on commission, but sets made the decision making easy.)

Since that time, I've learned yet more about cookware, and gotten a lot more experience cooking. And I've decided that most of the time, sets aren't the way to go. Now, if your primary motive for a new cookware purchase is to have something pretty to hang in the show kitchen you never actually cook in, then a set of All-Clad LTD is probably exactly what you're looking for. Maybe even the copper clad, if you have live in help.

But for the rest of us, buying a set means you often end up with pieces you might not otherwise buy. Or at least, might not buy in that format. The previously mentioned All-Clad is excellent cookware. But it's very expensive. An All-Clad tri-ply 8 qt stock pot costs over $250. But very few of the applications you'd use an 8 qt stock pot for actually require all that fancy tri-ply construction. You're boiling pasta water, or making soup or (gasp) stock. For most people, a much cheaper stock pot will do the job just fine, and you can get some excellent buys on this sort of thing from your local restaurant supply store. When it comes to stock pots, even All-Clad agrees - they've introduced a lower priced line of large stockpots that have a reinforced disk at the bottom instead of being fully clad.

So what should you buy, then? I can't claim to be a complete expert on cookware, but I do know what I like and what I use. And I've recently become a cast iron convert. Now, cast iron isn't for every application. It's slow to heat up, and slow to cool down. It holds a lot of heat, so it doesn't respond quickly to adjustments you make at the stove. But nothing is better at putting a really good sear on a steak, for example, and I find it suitable for a wide range of cooking applications. It goes seamlessly from the stovetop to the oven, and back again. Properly seasoned it is as non-stick as some teflon coated pans, and it's much easier to ensure that it is properly seasoned now that Lodge is selling pre-seasoned pans. You'll need to treat it right as you use it, but at least they get you off to a good start! Oh, and did I mention that it's cheap? And nearly indestructible? I think every kitchen needs at least one good cast iron pan. I prefer the 12 inch skillet, as I think it's the most versatile size.

Part Two: Anodized Aluminum
Part Three: Stainless Steel

Saturday, August 26, 2006

Risotto in the Pressure Cooker

The first job I had when I moved to Ann Arbor was selling cookware at Kitchen Port, a local kitchen shop. It was an interesting job, and I learned much of what I know about cookware, knives, and gadgets during my time there.

I always had a fascination with the pressure cookers, but at over $100 for the smallest of the Kuhn-Rikons we carried, I wasn't willing to pony up the money to try one out. The promise of a pressure cooker is significant - no need to braise a stew for hours and hours, just pop it all the pressure cooker and 20 minutes later, dinner is served. But I wasn't willing to take a chance on the reality.

So when I came upon a pressure cooker for $1 at a yard sale last summer, it was a no-brainer that I would buy it. If it didn't work, or I hated it, I was only out $1. If I actually used it and liked it, I could decide if I wanted to get a more elaborate one.

It worked fine, and a year later I'm still thrilled with it. I haven't used it a lot, maybe pulling it out once a month or so, but it was only $1, so in any calcuation of meals per dollar spent on cookware, it totally wins. Perhaps this winter I'll try a few more stews and get a little more adept at using it. But yesterday, faced with a conflict between my desire for risotto and my aversion to standing over a hot stove for 25 minutes in the 100% humidity we're living in right now, I decided to try it out for risotto.

Using a pressure cooker for risotto seems counterintuitive. Afterall, the defining characteristic of risotto for most of us is that you have to stir it constantly, and you can't do that with a sealed pot. But lots of people absolutely swear by the pressure cooker version (although the method is not without it's detractors), so I thought I'd give it try.

It certainly was easy - saute some aromatics, toast the rice, add the liquid, put the lid on, and then it's just a matter of timing the cooking. There's not a lot of savings in cooking time, but since you don't have to stir, it's time you can spend doing other things. Taste wise, it was pretty good. Next time I would cook it for a minute or two less, as it had gone past the nice firmness one expects from a risotto. The chicken stock I used was unsalted, so it would have been better to add some salt earlier in the cooking process. It was a little denser than a stirred risotto, but that may also have been a factor of being a little overcooked. My husband said that, given the choice, he'd prefer non-pressure cooked risotto, but that he certainly wouldn't say no to another helping of this one.

Here's the recipe I used, adapted from The Pressure Cooker Gourmet. The recipes in this cookbook look great, and I bought it very enthusiastically, but I haven't used it nearly as much as I thought I would. Maybe a resolution for the fall...

Pressure Cooker Risotto
1 tbsp butter
1 tbsp olive oil
1 leek, white part only, cleaned and sliced (onions or shallots could be substituted)
1.5 cups arborio or other risotto rice
0.5 c white wine
3.5 c chicken stock (preferably homemade, add salt if necessary)
1/3 c grated parmesan reggiano (about 1 oz)
salt and pepper to taste

Melt the olive oil and butter in the pressure cooker. Add the leek and saute for a couple minutes, just until soft but not beginning to brown. Add the rice and stir to coat with oil. Cook for about 2 minutes, or until it starts to have a toasty aroma and the exterior looks translucent. Add the white wine and cooking, stirring, until the wine is absorbed. Add the chicken stock, then put on the pressure cooker lid. Bring up to pressure over high heat, 3-4 minutes, then lower to medium and cook for 5 minutes. Remove from heat and let stand 6 minutes (original recipe said 8). Carefully release any remaining pressure and open lid. Stir in cheese and season to taste.

This would be great with some blanched or steamed fresh vegetables and some chopped parsley stirred in with the cheese.